This is the latex that most nail artist use to easily clean up the skin around their nails whenever they make nail arts with messy methods such as ombre nails, stamping, and such. This made the cleanup using cotton swabs and nail polish remover easier.
You can also use latex that is used for prosthetic but this is more convenient and a lot cheaper than that. I also read somewhere that peel-off face mask works, too, but I haven't tried it yet. There are actual peel-off stuff out there like Liquid Palisade, Simply Peel Latex Barrier, Mani Made Liquid Tape, and many more but those require money that I can't provide yet, or even if I can pay for it, I wouldn't when there is an cheap alternative for it.
Elmer's glue is a famous cheap alternative for it. I used to use it straight from the bottle so I would waste any nail polish bottle for it, but I was so tempted to make my own with its own color so I made this.
Materials I used:
Empty nail polish bottle (I used Caronia's)
Elmer's Liquid Glue
McCormick Food Flavor
Water
Toothpick for mixing
Plastic cup
1st step: Clean up your nail polish bottle. Put acetone or nail polish remover on a cotton ball and wipe the nail polish from the brush to clean it up. Repeat the procedure until there is no spot of nail polish on the brush.
On cleaning the nail polish bottle, put acetone or nail polish remover inside the bottle. Let it sit for a minute then pour it on a piece of paper towel or on the ground outside your house. You can also shake it so it will be reach the other parts of the bottle. You can use a cotton swab or Q-tip to clean the tube of the bottle. Repeat the procedure until there is no spot of nail polish on the bottle.
2nd step: Put a generous amount of glue on the plastic cup that you think will fit on the bottle of your choice. Then add water that 1/4 of the amount of glue you put in. Mix it in using a toothpick. Don't put too much or it will turn too runny that it should be. You don't necessarily have to put water in it. This is optional but I think putting water in it makes it faster to dry on your skin.
You can stop here or you can continue reading if you want a colored peel-off since this will just turn out clear when it's dry and I find it hard to see on your skin.
3rd step: Add a food color or food flavor in your mixture. I chose McCormick Ube Flavor which is colored violet.
I added few drops and this is how it turned out.
I thought it is too light so I added few more drops. I wasn't careful and I dropped too many food color on it.
Just mix it all in until the colors are even.
There you have it! Your very own DIY Peel-Off Stuff. I poured it on the bottle. You can use a funnel to make less mess when transferring it out.
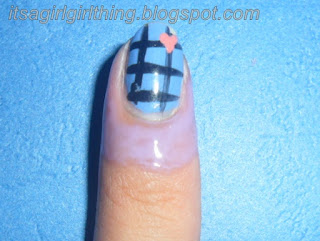
I tried it on my nails and here are the results.
(This nail art is my Heart Checkered Nail Art. The tutorial through photos is here https://itsagirlgirlthing.blogspot.com/2016/01/heart-in-checkered-nail-art.html)
I put a thin coat of it around my nails. It dried for about five minutes.
It looked like this when it dried out.
It easily went off when I removed it using tweezers. The only negative side about this is that it stained my skin.
It is not really that visible on the photo but it kind of left stain on my skin. But! It can be washed away by water. I don't know if it is because I put too much food color on the mixture or what but acrylic paint also go well with this and it doesn't stain on your skin!
What are you waiting for? Go and make your own cheap DIY Peel Off Stuff! :)
xoxo


No comments:
Post a Comment